Creating a proof sheet

Hi there,

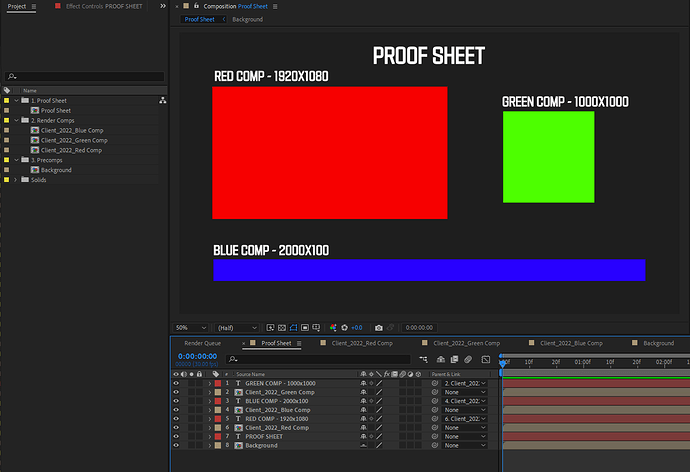
I am brand new to this software having only discovered it today, but I’m thrilled because I really think it could be the answer to this itch I’ve been looking to scratch for several years. I’ve been playing around with it for the last few hours and have watched some video tutorials and I realize it’s potential, but I’m still struggling to accomplish what I’m trying to, despite the fact that I think this should be easy. But you tell me. I’ve attached a screenshot showing what I am trying to accomplish.

So with my job I am constantly putting together proof sheets of multiple different sizes of a design on a background in a 1920x1080 frame. So my render comp timeline ends up looking like a bunch of precomps stacked together, laid out, with the very bottom layer being a background precomp. I also manually add text layers along side each precomp, with information about the size (usually name + dimensions). This gets tedious when you’re doing this multiple times and constantly rearranging the precomps in order to best fit them.

Here is what I would like to accomplish upon pressing the magic button:

  1. Determine yes/no if the layer in the active comp is a composition or not. (Ideally, this would exclude the bottom layer composition, since it’s a background design layer and does not need this text treatment.)

  2. If the layer is a composition, create a new text layer above that composition, and parent it to that composition.

  3. In that text layer, list part of the composition name, along with that composition’s pixel dimensions. (i.e. the comp name is Client_2022_Red Comp, but we only want to use the Red Comp part of the composition name text string).

So as an example, a 1920x1080 composition called Client_2022_Red Comp would result in a created, parented text layer that reads “Red Comp - 1920x1080”. Multiple compositions inside the main composition would result in multiple text layers, each with their own names and dimensions.

Perfect world, there would be abilities to select font, or justification (centered above the comp, aligned left, bottom, etc), or character selection (a using an underscore instead of a hyphen, for instance). But those are superficialities.

Thanks so much, apologize for the length, I tried to be specific. This would be amazing to get working because it really has been my white whale for a long time. Thanks again!

James
Hi @ripe4parody , welcome to the forum!
Thanks for the detailed explanation, that helped a lot!!
I am glad you found about automation toolkit.

it is possible to create this “magic button” although it’s not easy at all, the combination of all the alignment options (left, center, right) and the position options (top, bottom) makes it quite complicated, each alignment needs different alignment operations.

I colored the lines base on their functionalities:

green: setting up all the settings for the automation (position, alignment, separator, font size, padding and font), maybe in next update all the inputs can be shown in only one window at the same time.

brown: calculate the name for the text layer and creating the text layer with the text.

blue: setting the order of the text layer, changing the font and the font size.

pink: aligning the text layer to the composition layer, using anchor point manipulation on both of them, then restoring the anchor point position of the composition.

yellow: parenting the text layer to the composition layer.

Download -
Create Text Layers.zip (4.8 KB)

this is hard automation to start with, I hope that you will understand some of it.
let me know if you have more questions,
Alon

Hey @alonshemer! My eyes are literally wet at seeing this in action - thank you so very much for putting this together for me, and so quickly. You are right, this is absolutely a hard automation to start with - I hadn’t factored in how much more complex the variables like separator and font size would make it. It’s very hard for me to see what’s going on but again I am extremely new to this. I’m going to go through unchecking and rechecking layers to see how they interact with each other. But what you have built has given me a great starting ground to play with. Now that I see it in action, I’d probably take out the font size option completely (the smallest value currently, 50, is already likely as big as we would ever need the text to be to begin with). And I will eventually be interested to see how to turn the separate questions into a multiform page. But I can play with all that.

Seriously thank you so much for doing this and again so fast. I wasn’t joking when I said this was a long goal of mine, and to see it in action really is just amazing to see. I can’t wait to tell everybody in my department about this at our meeting next week, and I’m sure we’ll have Automation Toolkit on everyone’s computer soon thereafter.

I am sure I will have further questions as I play around with this (and break it), but I will try not to be a bother. Either way you’ve gotten me well past the finish line. Thanks again!

James

for now unfortunately it is not possible, but I will try to implement it in future update.

I glad it works and happy to help and answer any question, I can create those automations very fast because I basically know this tool like the back of my hand.
trying to disable and enable lines is a very good way to learn.
you can change the settings to better fit your workflow.

thank you :slight_smile:

don’t forget that you can change the font too, I have set it to Arial Regular,
you first will have to find the name for the font, it is a special name different from the ui name.
use this automation to get the name for the selected text layer font -
Get Text Font.json (5.4 KB)