Hi! Is there way to make AT that can import and place to active comp a Image or Video from external folder (wiith premaded path)
Here I tried to do something similliar but with a folder :0
This script is only can import, but can’t place item/items to active comp
Hi @krkrkrkr,
it is possible,
-
you can just create a file variable, click on the folder icon and select your file.
-
then you can import it using the file action “import” and select file or sequence.
-
after importing it to the project you have to find it again because now it is not a system file, it is a project item (or just item) so you have to loop over the items in the project and search for an item with the name of the file you just imported.
-
then you have to save the active composition as an item variable, and use the action “add item” and select the project item you searched earlier to add it to the composition.
You can download these automations to see how it works
(I commented each line with a new feature from v2.0.3) -
Import file.json (8.2 KB)
Import folder.json (14.5 KB)
Please let me know if you have more questions,
Alon
1 Like
What if the file you are importing is an image sequence? I can change the 3rd line to import an image sequence instead of a file, but then the automation fails when it searches by name because the name of the footage when imported is unpredictable (ie. [000-030] in one instance, [000-014] in another instance, depending on how many frames are part of the sequence).
Hi @efraser88 , you have to import one of the image files in the image sequence folder, for example “file_0000.png” with the “image sequence” import option as you mentioned.
it can be any of the images in the image sequence folder, and it should detect the first one and the last one automatically.
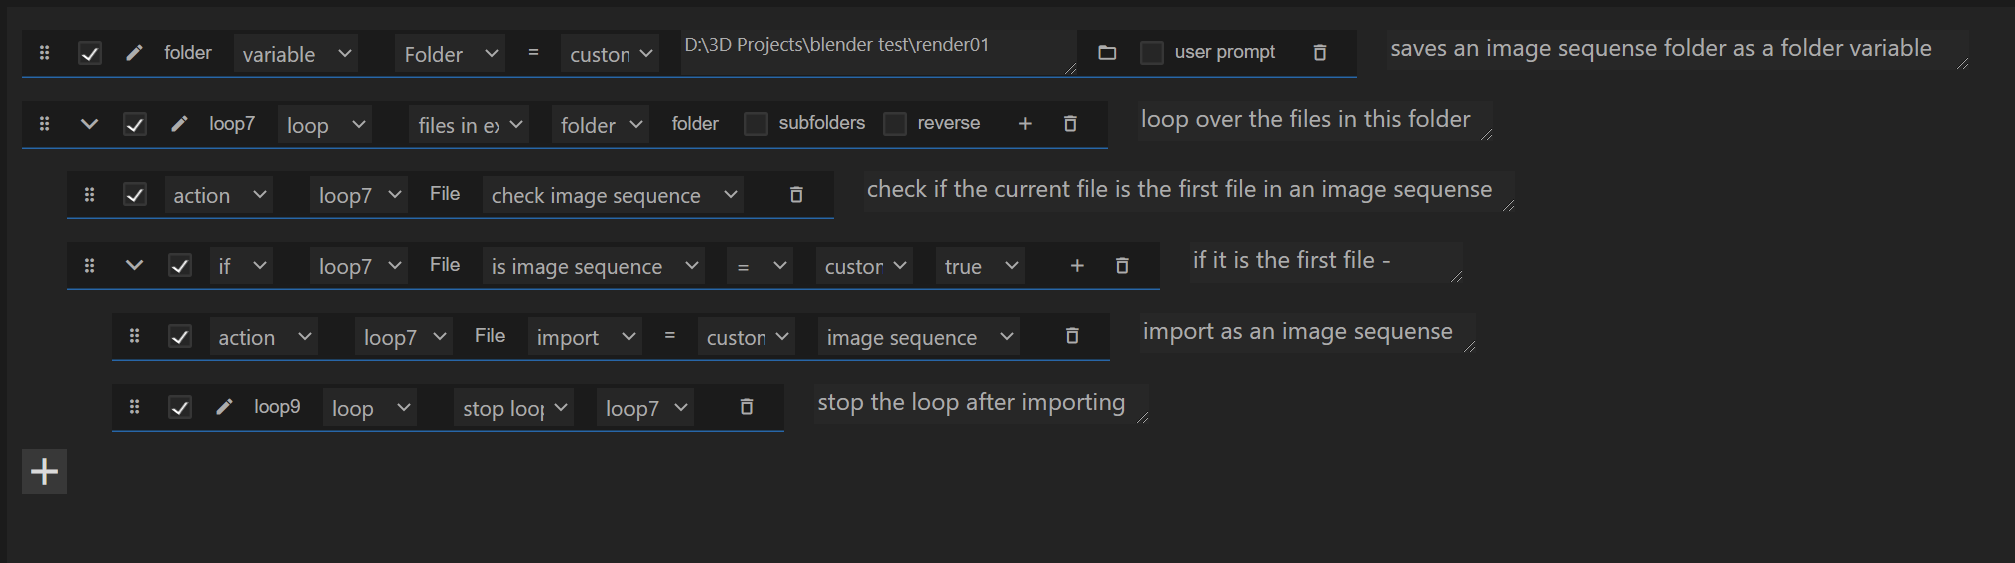
there is also another way to detect if a file is the first image in an image sequence folder -
there is a file action called “check image sequense”, this action checks if the file is the first file of an image sequences and set the “is image sequence” file property value accordingly. then you will check if the “is image sequence” property value equal to true, and if it is, import this file as image sequence and stop the loop.
- stopping the loop is really important, this will stop the automation from checking all the files in the folder after finding and first image and importing it, and it will save a lot of time.
here is an example -
Thanks, but once it is in the project, how do I make changes to the imported file, ie. setting its parent folder to something, or adding it to a comp. In other automations I’ve located the file by name, but with an image sequence the name cannot be predicted, so the automation fails.
@efraser88 I totally didn’t understand your question, but now I do.
you are right I should add a file property that contains the imported project item, it will eliminate the searching process.
method 1 - by selection (simple) -
when you import a file its project item will be selected by default, you can use this information to identify it, before importing a file, loop over all the items in the project and deselect them by setting the their “selected” property to false, then import the file, and finally you can loop again over the items in the project and search for the selected item and it should be the imported item.
method 2 - by id (more complicated) -
you can know for sure which item it is by its id property. each project item have an id (a number), so if you save all the project items ids as a list of numbers before importing the image sequence you can later check if there is an item with an id that not exists on that list.
for example, before importing the file, create a text variable (can be also a collection if you know how to work with them) that will add up all the ids with a comma between them “18,3,19,34,53”, after importing the image sequence you can find over the items and find an item with an id that not exists in this list, an it will be the newest imported item.
let me know if you want an example for one of them.
the first method is very simple
Thanks for explaining it so thoroughly, I think I’ll try method 1. If you have an example that would be amazing, but I think I can figure it out on my own.
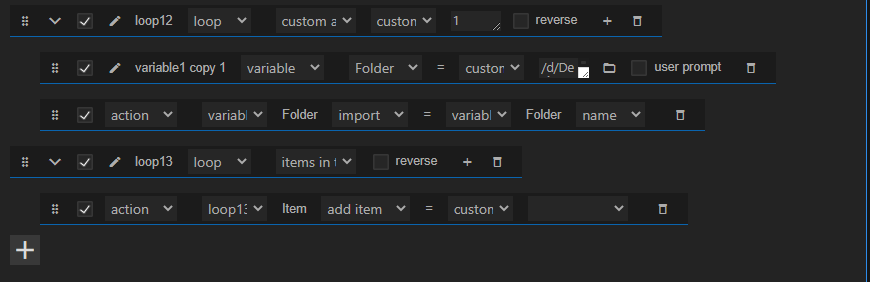
@efraser88 Here is an example for method 1 -
- in the first 2 green lines we deselect all the project items.
- then we import an image sequense from a specified folder.
- In the last 3 green lines we again loop over the items in the project and check if there is a selected item, and if we find one it means that it is the imported item.
let me know if you have any more questions
1 Like
Thanks so much! The only annoyance now is that with the deselect loop, the automation ends with every folder and subfolder opened and I have to go and collapse everything afterwards. I disabled the deselect loop and it still works, and I guess I just need to remember to have everything deselected before running the automation. Or maybe there’s a “collapse all project folders” action that I’m not seeing?
@efraser88 You are right, all the folders will open.
I found that if you search for a project item in the search box in the project panel and remove the search text it will close all the folders, but other than that I don’t know of a menu command that can do that.
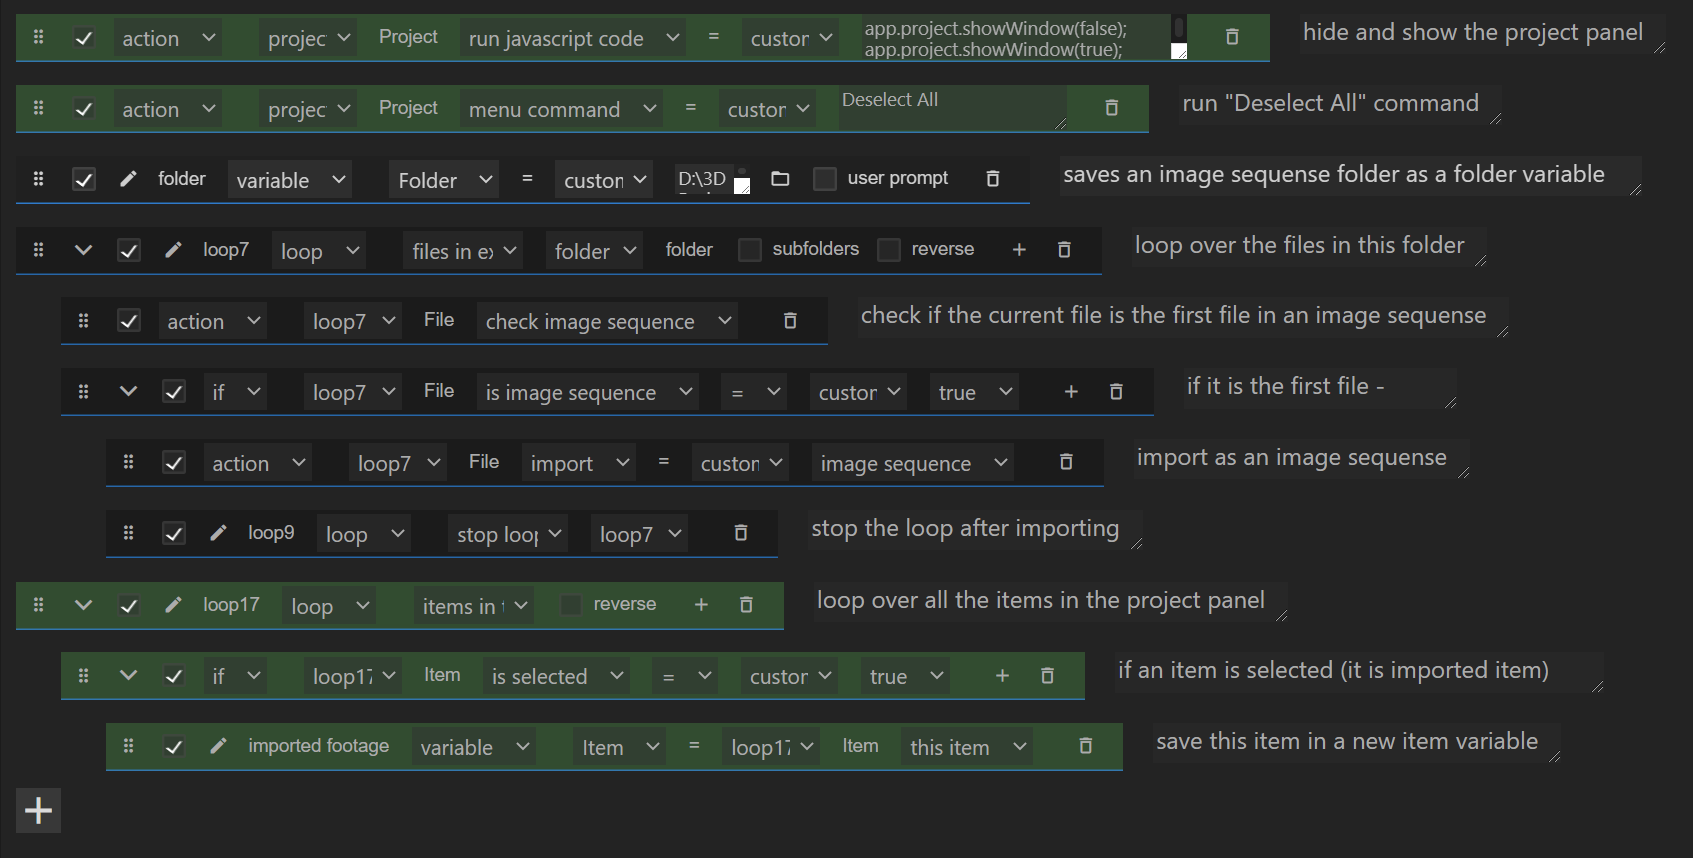
As a workaround we can deselect all project items in the project panel using another method, there is a menu command called “Deselect All” in the “edit” menu, if the project panel is active running this menu command will deselect all the the items.
In order to make the project panel window active (highlighted in blue) we need to use the project action “run javascript code” and paste this code -
app.project.showWindow(false);
app.project.showWindow(true);
this code will hide the project panel and then show it, it will make it active.
then we can run the menu command “Deselect all” and it will deselect all the project items.
- keep in mind that you need to enable in the automation settings in the advanced settings “Allow automation to run external javascript code”.
with these changes the automation will look like this (only the first 2 lines has changed) -
or we can use method 2 (it will also solve this issue)