After testing the free version i finally went pro yesterday
Can somebody point me in the right direction pls - I am most likely doing things too complicated, but what i would like to achieve is basically a “Pre-render selected comps and import without replacing the original comps”.
Working already except for the re-importing.
Why non-destructive adding? => I have another script that takes all comps from my “_finalRENDER” folder and reduces from there. I dont want the original comps to disappear.
I got this far:
Clean render queue
Add selected comps to render queue
Set render presets in queue
Render
Create “_prerender” folder if it doesn’t exist already
Move prerendered files in that folder
Now struggling with:
7. Open comps where selected comps are implemented
8. Add + solo resp. rendered comp
9. (Maybe close these 10< comps again for better overview)
10. (Eventually automatically replace these items when i do a re-render so comp doesn’t get cluttered)
I also looked through this script, but somehow it doesn’t do anything, what am I missing?
Reimport via Item IDs or Name, at what time should i store them… Not a programmer unfortunately
Easier solutions are definately welcome!
Oh, and I already took some lines from other posts here, they helped my learning a lot, thank you very much guys!
Too bad, I was just told “new users can not upload attatchments” - how long will I be new? Would like to share this with you…
Hi @thepetercoin , Welcome to the forum!
Thanks for the detailed post,
from what I have understand you are trying to create a proxy system that renders proxies of the selected compositions and import the proxies back to the project under “_prerender” folder and smartly replace existing proxies with the new proxies.
I change some settings in the forum and you should be able to upload files now, so if you can you share with me your current automation I will be able to help you continue from that, or I can create this from scratch.
also the automation that you linked, should work by selecting a composition, then it will prompt you to save a file (so you have to select a location and a name), and then it renders and import it back to your project the file and add it the same active composition as layer number 1. (quite similar to what you are trying to do)
You are quite the fast replier, thx!
Quite right, I actually wasn’t really thinking of proxies (which are as far as I understand usually of lesser quality) but if i crank the settings up this wouldn’t make a difference I suppose…
I would like to primarily create these new proxies (as in "prerender, import to comp, solo and do not replace original) and - if possible - when i prerender again to smartly exchange the previously created proxies.
You know what, I just noticed I don’t really need the optional “if pre-rendered the 2nd time then replace” - bc they are overwriting the original file name anyways - so its going to be an auto-replace!
@thepetercoin Thank you for sharing your automation. I always aim to respond promptly.
I wasn’t familiar with the “Pre-render” option in After Effects, so I needed a moment to understand it. However, after reviewing the automation, it made sense.
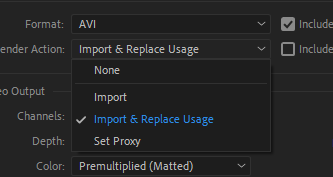
About “Pre-render” : It’s not the right choice for this automation. Instead of helping, it does the opposite. When you use “Pre-render”, it sets the “Post Render Action” to “Import & Replace Usage”.
If you know your way around, you can manually set this via automation toolkit render properties
When you send a composition to render, the default “Post Render Action” is “None”. If you select “Create Proxy”, it changes to “Set Proxy”. Choosing “Pre-render” will switch it to “Import & Replace Usage”. If I got it right, you don’t want to replace usage.
Better Approach:
Continue to send compositions to the render queue (after clearing it).
Prompt the user to pick a destination folder using the “user prompt” checkbox.
Go through each item in the render queue and set the output module preset (e.g., “High Quality”, but you can customize this).
Define file names and parent folders for each render. The parent folder is the one chosen by the user. Naming can be tricky due to possible overlaps. Here’s a naming suggestion:
id-{item id}_{composition name}_ver{loop index value}_prerender
Example: If the item id is “241” and the composition name is “Comp 1”, the names would follow this pattern:
id-241_Comp 1_ver1_prerender
id-241_Comp 1_ver2_prerender
… and so on.
A loop (from 1 to 2,000,000) helps generate unique file names. For each iteration, we’ll check if a file with that name already exists. If it does, we increment the version number. Once we find a unique name, we stop and use it for the render.
Rendering and Organization:
Start rendering.
Create an “assets” folder within the project (only if it’s not there already). Save it as an item variable you did in your original automation.
After rendering, revisit each item in the queue and import its corresponding render file. Use the file property of each output module for this. Then, retrieve the imported item using the “imported item” file property and move it to the assets folder.
Finally, for each source composition, remove old prerender layers and add the new prerender item.
if you want to overwrite the file names instead of versioning them, we can easily modify it to work like that, we can just remove the loop that generate the name and make a default name that will result the same name each time and will replace the file when rendering the same name.
There are pros and cons for this method of same names -
Pros -
less files on your computer, you don’t need to clean older pre-renders
easy to write in the automation
Cons -
if the render fails with an error, you can lose both the older and the newer pre-render files, which makes it risky for big projects.
you can’t use the older prerender to render the new pre-render file, because after effects can’t overwrite a file using the same file, it will prompt an error that you need to remove this file from the composition before the render. so if you need to change little part of the frame and you the prerender file with a mask on the rest of the frame it will not work.
you wont be able to move back to an older prerender file if you find and error in the export, or a client prefer the older version, so it is safer to keep both versions.
this post is huge, so don’t feel rushed to go over it, let me know if you need more help or if you have any questions.
@alonshemer what a packed post, thank you so much!
Working - and most of all: I understand it
I just took the manual choice of the render folder out bc in my case it always should go to the relative _prerender folder.
In combination with a cleanup script (which I found here and modified to clean all that has nothing to do with my main renders) I also got rid of the old renders in my project. Yes, the ssd might get some unnecessary files but in the end I will collect anyways.
One more question: Is this possible or do I need to create an external jsx script to save a copy?
Before my script I would like to:
Save
Dialogue window to add a ShortDescription
Save a copy in this format: \archive\Filename_ver23_ShortDescription.aep
I did manage this (by taking part of your counting up “ver#” script), but with “Save As” and not “Save a Copy” so it re-opens the original project, but that can take ages in my case. Save + Save Copy to Archive.zip (3.5 KB)
fyi, I work as a 3d artist in gambling so as you can imagine, there is a lot of repetitive work, also animation wise w/ symbols and stuff. So thank you for making me more efficient!
Edit: in case anyone is interested, i copypasted myself a .jsx for this incremental save. Except it is not yet searching for existing file increments and continuing this number in the new filename. Save_And_Increment_w_Comment.zip (420 Bytes)
@thepetercoin , I am glad it works, and well done for understanding this 50+ lines automation, I can see that you are very technical user and this is very helpful trait for working with AT.
I usually take the “folder user prompt” approach instead of making it fully automatic to not make it too complicated, but good job for implementing this.
The problem with using “Save a Copy” function is that it is not implemented by adobe in the after effects scripting language that AT using, so we need to find workarounds to use this action.
Workarounds -
1. Copy the current project file manually to the target folder and rename it -
While It is possible to copy the .aep project file to the target location using Automation Toolkit (there is a file action called “copy to” that gets a target folder variable) but it is not possible to rename regular files, it is not possible mainly because of safety concerns, I am afraid of people creating an automation that mass rename important files, so I limited the renames for a specific file type with an “.atae” file extension (also renaming files by mistake can be very troublesome).
Instead you can run an extendscript code - using a project action “run javascript code”, with this project action you can run extendscript code and other after effects script files without these limitations, it is also possible to integrate it in the automation using 2 other properties that let you pass variables from the automation to the code and get an output from the code back to the automation, so the automation and and code can work seamlessly with each other (the 2 other project properties called “javascript variable inputs” and “javascript code result”), you can read more about how to use them in their tooltips.
here is a version of your automation that uses the “run javascript code” to only copy the file to the target location and rename it at the same time, the previous automation that you created handles almost everything, I just added 3 lines (in blue) that uses code only to execute the specific missing function to copy the file.
You can also only run the entire script that you created from within the automation, and not use the automation functionality like I did in this example.
2. using the “copy to clipboard” to automate only the naming of the file -
We can create the name for the file (as you did) and use the “copy to clipboard” function to copy this text and when using the “Save a Copy…” menu command, we can just paste (CTRL V) the generated name and we just need to select the folder. so it automates half of the process.
@alonshemer . You know I just expected a little help from your side, but you are SO helpful.
Been trying to figure out this one last thing (promise!) for the last 2 days
I would like to have the version# to increment no matter what and then add the suffix with the next increment so i have list like:
Currently it only increments when the suffix is identical and starts counting from 1 when the suffix changes.
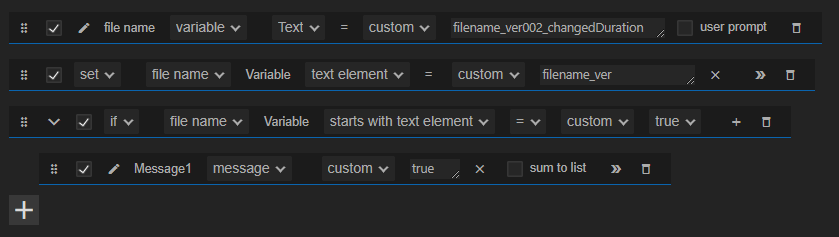
I think I figured out how to make an index +1 but struggling to do a “check if filename starts with filename_ver*”
Current output:
filename_ver001_newColor
filename_ver002_newColor
filename_ver001_addedRenderQueue
In this example it will check if the text “filename_ver002_changedDuration” starts with "filename_ver”, and it will continue to the “if” scope if true.
I’ve made several modifications to the last automation I sent, specifically in the green segment. Here’s a breakdown of the changes:
Version Number Generation Approach: I’ve adopted a new method for generating version numbers for each render.
Loop Removal:
I’ve removed the loop previously set to run a “custom amount of times.”
This loop used to check for the existence of a name with a specific version index.
New Method:
The new method loops through all the files in the destination folder.
It identifies the file with the highest version number and then increments this number.
This approach is slightly more intricate because it necessitates extracting the version number from the complete file name.
File Name Parsing Example:
Consider the name: “id-255_comp 1_ver5_newColors.mov”.
To retrieve the version number “5”, I crafted the consistent beginning portion of the file name, which is “id-255_comp 1_ver”.
I then used an action to determine if the complete name contains this specific sequence (as i showed you above).
If a match is found, the sequence is removed, resulting in “5_newColors.mov”.
Using the number variable “convert text to number” action, this can be converted into the number “5”. This action smartly disregards the “_newColors.mov” portion and focuses solely on the number.
Maximum Version Number Retrieval:
To identify the highest version number, a technique to find the maximum value in a list of numbers is used.
I created a number variable that retains the largest discovered number.
The process starts with the number 1.
Each time a file name with the known prefix is located, the version number is compared.
If a discovered version number exceeds the current maximum, that number becomes the new maximum.
At the end we use this maximum number (and increment it by 1) to generate the final name of the output + the suffix
@alonshemer I would say the Pre-Render automation is perfect now!
And thx for the example of text comparison, got that! But I don’t know how to apply this when trying to check if any filename in my _archive folder starting with "filename_ver*"already exists so I could continue counting versions up from there.
@thepetercoin ,
Sorry, I didn’t understand you correctly in your last post, I taught you were asking about the “Pre-Render” automation but you were obviously asking about the “Save + Archive” automation.
You are completely right, it shouldn’t work like that, this was a bad implementation by me
We can apply these changes in the “Save + Archive” using a similar way as I did to the “Pre-Render”, I just copied the green lines and made small changes.
The process is essentially the same -
Creating a text variable with the first part of the text “filename_ver” (the filename is a variable).
Creating a number variable that will store the maximum found version number (starts from 1).
Loop over all the files in the “_archive” folder.
Check if the name of each file in the “_archive” folder starts with the “filename_ver”.
If it is, extract the version number from its name.
If the extracted version number of the current file is greater than the maximum number variable, set the maximum version number to this number.
the “maximum version index” variable will store the highest version number in the folder, we will increment it (so if 10 is the highest version number in the folder, we will increment it to 11 ), and then copy the project file to the “_archive” folder with the new name (using the incremented version).
Small Change-
I changed the start value of “maximum version index” number variable from 1 to 0, so if we can’t find any file with version in the “_archive” folder we would increment it from 0 to 1 and not from 1 to 2.