Export list box to spreadsheet?

Hello,

I was wondering if there is a way to export the contents of list boxes to a spreadsheet compatible format? I know we can copy & paste but am hoping to skip that step to create a kind of “export report” automation.

Any help appreciated. Thanks!

Hi @pennytron , long time!

It is not possible with list boxes but it possible using collections.

There is a well known spreadsheet format called CSV (comma-separated values), if you know how it works and formatted you can create it yourself and format it correctly to create a working csv from AT and save it as a file.


About CSV:

In it simplest way it is formatted that a comma is separating between cells and new lines is separating between rows.

Example:

item 1,item 2,item 3
item 4,item 5,item 6

Results in:
image

A small complication -

If a cell contains a comma(,), a new line or a quotation mark("), this simple formatting becomes a little bit more complicated.

The safe way to format csv is to replace each quotation mark(“) in every cell with double quotation mark, and wrap all the cells with quotation mark(”).

example:

Lets say I want the add a comma in cell A1 without creating new cells,
I will format it like this-

"item 1, test","item 2","item 3"
"item 4","item 5","item 6"

The result will be correct:
image

If I want to wrap the 1 with quotation mark, I will need to place 2 quotation marks for each existing quotation mark.

"item ""1"", test","item 2","item 3"
"item 4","item 5","item 6"

You can see the the 1 is encapsulated by double quotation mark (“”) instead of just one (").

The result will be:

image

This is all you need to know about csv to format it correctly inside Automation Toolkit.


I created an automation that saves a csv file of all the layers in the active composition -

  1. it first asks the user to save a new file.
  2. it creates an empty collection for all the rows.
  3. it creates the first row with all the titles for each column.
  4. it formats the first row using the methods I explained earlier.
  5. it adds this row to the rows collection.
  6. it loops over all the layers in the active comp.
  7. it creates a new row for each layer with all the necessary cells.
  8. it formats the row and adds it to the rows collection.
  9. it saves and open the csv file.

Download -

Export Comp as CSV.zip (3.2 KB)
(I added a comment for each line)

If you didn’t work already with collections it can be a challenge to understand, but if you have any questions please don’t hesitate to ask.

You legend! Thank you! This is exactly what I was hoping to create!

I thought listbox might be the way to go but obviously was the wrong rabbit hole to go down. I am slowly getting my head around collections; I know what they do and getting the hang of setting them up but I’m still learning. But this task is going to be the task where I finally master it.

Thanks again!!

Hi Alon, I have come into a problem and I can’t work out a solution.

I am using IF to only list layers that are enabled, however it returns empty rows rather than just skipping the value altogether. I’m getting this by placing the actions of “Row” collection into an IF loop. Is this correct?

I don’t know where I should be looking to start setting up steps to remove the gap.
Thanks in advance!

----- EDIT: I worked it out; I don’t know what I’ve done but I have it working magically. However, would still like some pointers on how you would approach this. I’m even curious how to remove duplicate data in collections as well if that is even possible?

Hi @pennytron , Sorry for the delay :sweat_smile:

I am not sure what you did wrong with the IF, but next time if you can send the automation it will be easier to find the error.

You were right in your attempt, it require only 1 IF line, as the first line under the loop “layers in the active comp”, it quite simple

Check out this edited automation, the IF line is colored redץ
Download -
Export Comp as CSV Enabled.zip (4.0 KB)


I am glad you found a solution :smiley:

I will try to explain a little bit about collections:

Collection is a list of things, it can be Numbers, Texts, Layers, Items, Properties or Boolean.
It can contain only 1 type of these objects, so it can’t contain Texts and Layers.

each object in the collection is referred as “element” in the UI,

we can visualize a collection using this format - [“Text 1”, “Text 2”, “Text 3”]
This collection have 3 elements inside, the first 1 is “text 1” and the last one is “text 3”.

we can create this collection like this -

image

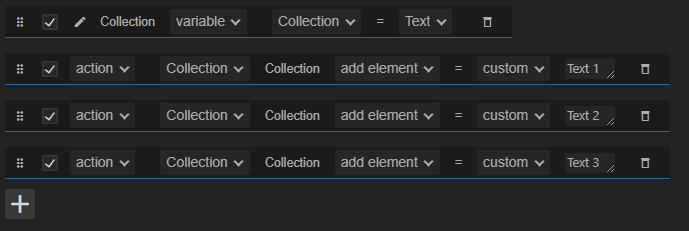
  • In this automation we create an empty collection →
  • We added an element to the collection at the last place so the result is → [“Text 1”]
  • We added another element to the collection at the last place so the result is → [“Text 1”, “Text 2”]
  • At last we added an element to the collection so the result is → [“Text 1”, “Text 2”, “Text 3”]

image

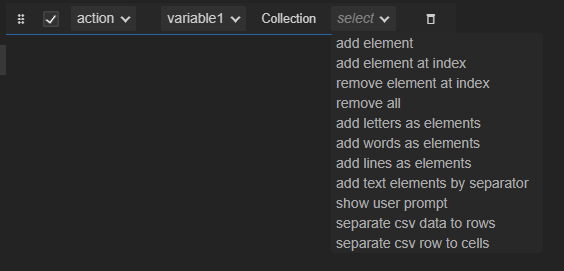
There are multiple available actions to manipulate the collection -

  1. You can add element after the last element.
  2. Add Element at a specific position in the middle of the collection.
  3. Remove Element is a specific position.
  4. There are more utility actions that lets you poppulate the collection eailsy.

(each collection type have different actions )


You can also change specific element in the collection by its index.

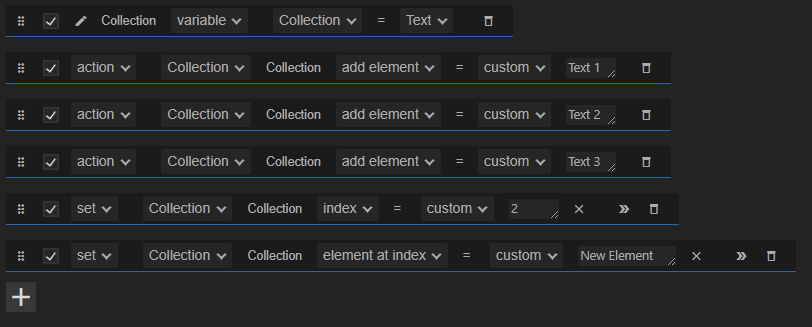
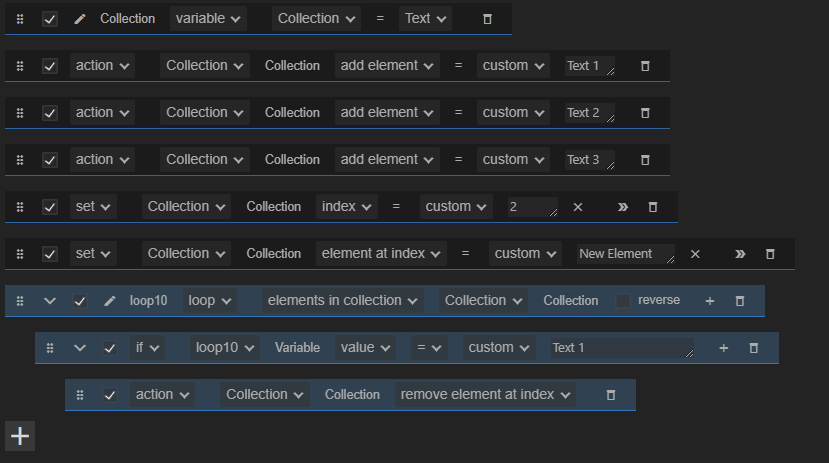
Check out this automation -

At the last 2 lines we override an element in the collection -

  • We created earlier in the 4 first lines this collection → [“Text 1”, “Text 2”, “Text 3”]
  • In line 5 we Set the “index” property of the collection to 2
  • Then we Set a collection property called “element at index” and we give it a new value of “New Element”, the result → [“Text 1”, “New Element”, “Text 3”]

Last you can loop over the elements in a collection using the loop “elements in collection”.

This loop goes over each element in a collection and sets each time the index of the collection to the current element index, so the “index” property of the collection will be updated automatically by this loop.

The loop also passes a variable with the value of the current element in the collection.
keep in mind that this variable is not linked to the original element inside the collection (its duplicated) and you will have to update the element in the collection to save changes you have made to it (using the set “element at index”).

Example:

You can filter element in a collection by looping over the collection, and check the value of each element, and if the value is needed to be removed you can remove the current element.

  • We continue from the last automation that builds a collection → [“Text 1”, “New Element”, “Text 3”]
  • In the blue part we first loop over the elements in the collection.
  • we check if the current element value is “Text 1” and if it is we will use the collection action “remove element at index” (the index is set automatically by the loop to the current layer)

Long post, I hope it helps to understand collections more, I recommend you try it yourself, like in the example build collections and manipulate them in different ways until you get it.

Please let me know if you have more questions.

Thank you so much, this really helps! I had no idea about the collection loop. So powerful!

I do have a question about getting collections to work with each other though. How would I use one collection and then subtract each element by the element of the same index?

For example:

Collection 1 - [10,20,30]
Collection 2 - [7,13,5]

10-7, 20-13, 30-3

Then all into a new collection with: [3,7,25]

I know it must be simple but I’m not able to work it out. Been stuck for a couple of days now.

I got it! I just needed a break from it and time to play around with the elements in collection loop which I’d not worked with before.

I would love to know if this is correct or if I could optimise it more.

subtracting collections.json (21.1 KB)

Edit to add: I was wanting to get the current times of an array of keyframes and find the duration between each, that’s why the AT attached has the extra loop of removing the first index

@pennytron Thanks for the update,
It seems that you’re starting to get the hang of collections!

Yes, the ‘elements in collection’ loop was added later to simplify working with collections. It gives you access to the current element in the loop while also synchronizing the index of the collection with the loop.


In your automation, you used the ‘element at index’ collection property inside the loop, instead of using the loop value, which is essentially the same value.

Both methods work, but using the loop value directly is simpler and cleaner.

Also, when you use the ‘custom amount of times’ loop with a collection, you don’t need to create an ‘index counter’ variable. The loop itself already has an index that increments with each loop cycle.

I updated your automation with those 2 fixes -
subtracting collections v2.json (22.4 KB)


Yes, it is correct, but you can further optimize it. I have created two additional optimized automations:

  1. The first one enhances your original version. For instance, it doesn’t use the ‘custom amount of times’ loop, and generally, you often don’t need this loop anymore when the ‘element in collection’ loop exists. It also optimizes the creation of collections with the action ‘add a list of numbers as elements’.

Download -
subtracting collections v3.json (16.2 KB)


  1. The second optimized version rethinks your solution to the problem and creates a new one. In your scenario, you don’t really need to subtract one collection from another because it’s the same collection. Instead, you can subtract the last element from the current element.

For example, consider the collection [16, 23, 38, 42, 55]: (reversed version)

You can loop over this collection, starting from the second element. Then, subtract the last element from the current one and add it to the duration collection.

  1. You start with the first element: 16. Since it’s the first, you simply save it as the ‘last element’ variable.
  2. The next element is 23. You take 23, subtract the last element, which is 16, to get 7. Then, you add this to the duration collection, resulting in [7]. Lastly, you update the ‘last element’ variable to the current element: 23.
  3. The next element is 38. You take 38, subtract the last element, which is now 23, to get 15. Then, you add this to the duration collection, resulting in [7, 15]. Finally, you update the ‘last element’ variable to the current element: 38.
  4. The next element is 42. You take 42, subtract the last element, which is now 38, to get 4. Then, you add this to the duration collection, resulting in [7, 15, 4]. Lastly, you update the ‘last element’ variable to the current element: 42.
  5. The next element is 55. You take 55, subtract the last element, which is now 42, to get 13. Then, you add this to the duration collection, resulting in [7, 15, 4, 13]. Finally, you update the ‘last element’ variable to the current element: 55.
  6. The loop is finished.

Download:
subtracting collections v4.json (14.8 KB)